|
Making violin varnish |
|
After applying and drying the varnish, measure the frequency of the B1- and B1+ modes. Generally, the frequency ranges from 5 to 8 Hz for a good varnish with the same moisture content in the wood as before varnishing. If the varnish is too hard, this frequency can rise by as many as 20 Hz. To determine the exact actual value, you must know the wood’s moisture content by measuring the frequency of these modes. Assuming that the wood’s moisture content increases by 4% after varnishing, the mode frequencies will decrease by 20 Hz after varnishing, leading to an error in interpreting the true values of the B1- and B1+ mode frequencies. Conversely, if the moisture content decreases by 4%, the increase in mode frequencies can be as great as 40 Hz: the violin risks sounding like a trumpet. Consequently, it is necessary to heat the materials so that the wood’s moisture level does not exceed 6%. A level of 4% would be ideal; this can be achieved by heating the wood in a vacuum at 160°C. See the site: http://www.tonewood.ch/
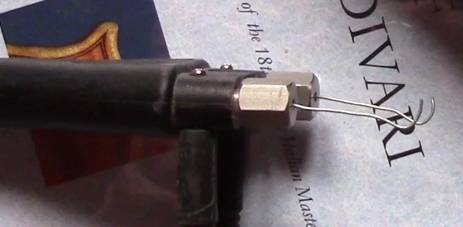
If you have a Gan moisture meter, remove the probes and replace them with two pieces of wire bent at the ends so they can be inserted through an f-hole, then measure the moisture content of the top plate’s underside.
Different types of fillers, sizings, and varnishes have been suggested in the literature of the trade. There exists no secret formula that can markedly improve the sonority of a bad violin. The various manners of priming the wood have always been considered by varnishers as simple workshop techniques allowing objects, furniture, or musical instruments to be varnished correctly.
There are at least four sizing techniques for preparing wood that are identifiable and perfectly valid. · Plaster of Paris (gesso) · Gelatine or animal glue · Linseed oil varnish containing 40% colophany · Casein.
Casein (alkaline substance)
The pH of the final product must be tested before using it on a violin. It is preferable to make one’s own casein using curd (fromage blanc or fromage frais) mixed with lime or borax.
Casein can be applied on the wood without previously filling the pores, for it adheres perfectly and uniformly to the surface, thus decreasing anisotropy in the materials, particularly when it is also applied on the interior of the sounding box (including the ribs).
Lime or borax casein sizings are absolutely translucent and highlight the wood grain.
Even if imported French fromage blanc is not available, an equivalent local product should be. · fromage blanc / fromage frais · Formaggio fresco in Italy · Quark in German; also Weißkäse; Topfen in Bavaria and Austria · Kwark / plattekaas in Dutch · Kvark in Danish · Kvarg in Swedish and Norwegian · Twaróg in Polish · queso batido de leche de vaca in Spanish · coalhada in Portuguese · Творо́г также допустимое ударение in Russian* · τυρί in Greek · lor in Turkish
If the lime is old, the reaction with the curd fails to occur. The lime must be heated in a pan so that water evaporates from it. Let the lime cool before using it. Careful: it is practically quick lime! The curd/heated lime mixture must not be used immediately, or the reaction will be too strong upon application to the wood and will yield a dark brown color. Instead, it must be set aside for approximately 30 minutes to let the quick lime become slaked lime.
Test the sizing on maple and fir samples before using it to coat the wood of an instrument. Depending on the reaction time of the casein glue being prepared, the result will be a lovely color of old wood or absolutely translucent sizing. Lime is an aggressive substance, so gloves must be worn while using this sizing in order to reduce the risk of dermatitis on sensitive skin.
The quality of the violin's sound is enhanced. Casein acts as an acoustic filter: the sound is purer. A silica (quartz) or colloidal silica filler can be added to the casein if prior sealing of the wood pores is not desired.
· Application of a casein-oil emulsion on wood presents no problems.
· This size can be applied equally well with a brush or a cloth.
· Casein size made with hydraulic lime can be used for 1 to 2 hours, whereas with borax, it can be used for approximately 24 hours.
· Lime or borax casein sizings are absolutely translucent and highlight the wood grain.
· Two coats are necessary to seal the wood properly on the inside as well as on the outside of the sounding box.
· The sizing is scarcely discernable inside the box after some time.
· Let it dry for several days in the open air or in a UV cabinet before applying the first coat of varnish. · If you do not wish to put casein on the outside of the sounding box, it is essential to coat the inside with it, to limit moisture content and not skew the delta between modes B1- and B1+.
Linseed oil
Even with cold-pressed linseed oil, it is difficult to determine the exact nature of the product and whether it contains additives. Three types of linseed oil are available to violin makers: organic (for salads), cold-pressed, and standoline (stand oil).
The fluidity of the linseed oil determines what quantity should be added to the varnish, as well as the rectified turpentine spirits.
Basic varnish:
55 g colophony (60 g without mastic drops)
5 g mastic drops (accelerates polymerization of the varnish)
50 g linseed oil
20 g rectified turpentine spirits.
The quantity of oil depends on its qualities and fluidity, as well as the outcome that is sought.
The mastic drops can be replaced by sandarac, or white dammar gum. A mixture of two resins is advisable: each one contributes its own advantages.
Only electric hotplates should be used to prepare varnish. These highly flammable products are dangerous when heated. Heated colophony produces toxic vapor with a persistent unpleasant odor. It is advisable to make varnish in a well-ventilated room, or preferably, outdoors, in a draft-free area. Never use nitric acid due to the risk of explosion.
In a stainless steel or enamel saucepan, melt the colophony over low heat up to 130 °C / 266 °F (approximately10 minutes to the liquefaction point: 120 °C / 248 °F). The colophony takes on a light red-brown color. To obtain a more intense red, heat longer –up to 10 hours– without exceeding 150 °C / 302 °F.
The color depends on the type of conifer from which the colophany was extracted (spruce is preferable - Kremer). Stir the colophany every 15 minutes. Last of all, add the mastic drops. The hot colophany can be spread on a marble plaque to let it cool down, for later use.
Heating colophany at very high temperature is unnecessary and certainly not advisable.
Colophony takes about 10 minutes to liquefy. Prolonged heating decreases its volume and weight, concentrates the color, but does not increase intensity. After heating for the time desired, add the mastic and heat another10 minutes at 120 °C / 248 °F maximum. Then set the mixture aside over very low heat to keep it in a liquid state (approximately 100 °C / 212 °F). Beware: at too high a temperature, mastic drops tend to foam and rise to fill the saucepan: stir with a wooden stick.
In another saucepan (stainless steel or enamel), add a tablespoon (level) of slaked lime to the linseed oil and mix cold. Heat the mixture (oil, lime) over low heat(120 °C / 248 °F maximum). Once the linseed oil has turned pale yellow and some foam has formed (15/20 minutes), reheat
Then heat the rectified turpentine spirit in a stainless steel or enamel saucepan. Once it has come to a simmer, reheat the varnish (colophony-mastic-oil 120 °C / 248 °F). Then gently pour the turpentine into the previous mixture and stir with a wooden spatula. Heat for 10-15 minutes.
Safety warning: If the turpentine has been heated at too high a temperature, it may spit out of the saucepan as you incorporate it into the melted resin and oil.
Filter while hot, let settle for a week, then decant and discard the colophony and lime residue.
To use this recipe as sizing, the wood pores must be filled beforehand. Then apply two coats of this sizing with your fingers and smooth it with the palm of your hand. Place the instrument in a UV cabinet to dry. To make intensely colored varnish without additional pigments, heat the colophany between 120
Pigments and varnish
Pigments can be used either dry, out of a tube, or by mixing them: burnt sienna (dry pigment or in a tube), brown (in a tube) or burnt umber (dry pigment or in a tube), dark red madder (in a tube), red madder (dry pigment), red iron oxide (dry pigment).
Add a very small amount of lamp-black or ivory-black or Prussian blue (pigment in a tube), according to the desired results. Using at least 3 of these pigments yields coloring that is a fair likeness to the violins of Cremona. Other color mixtures are possible according to the individual maker’s tastes.
On a plaque of ground glass (or other surface), using the fingers or a muller (pestle), mix the pigments to obtain the desired color (if the pigments are dry, add a little linseed oil with colloidal silica as a ground). Then add the varnish. The pigment/varnish mixture must be fluid.
Colloidal silica can be added to the unpigmented varnish. They must first be mixed by using a mull on a plate of glass; then applied with the fingers or with a paint brush, using small strokes.
Once the first coat of pigmented varnish has dried (approximately 3 days) there are two options: either you apply more layers of the pigmented varnish, or you alternate, laying down an intermediary coat of the same varnish but without pigments. Two coats of pigmented varnish suffice to obtain the desired color.
The unpigmented varnish is likewise applied with the fingers and palm of the hand. Begin with the ribs.
Once the desired color has been achieved, and depending on the consistency of the varnish, end with 1 to 2 or more coats of the same varnish without pigments.
If pigments in tubes are used, they must be of the highest quality. Fading of the varnish after UV drying indicates that one of the pigments was not sun fast.
A wide variety of colors can be obtained on violins by using only 3 pigments.
Generally, a good varnish raises the B1- and B1+ frequencies by 5 to 7 Hz, for it expels the superficial moisture from the wood. A varnish that is too thick and too hard creates additional surface tension on the extrados of the materials, thus increasing their stiffness. The B1- and B1+ mode frequencies can rise by as many as 20 Hz. Consequently, a varnish that is thin and supple, yet has acceptable coloring, increases the chances of avoiding these disadvantages.
It was no heresy when Abbot Sibire wrote in his book, “La chélonomie ou le parfait luthier”: “The varnish was stripped from the violin in order to give it a light coat. Scarcely freed from its oppression, it breathed and suddenly rendered big beautiful sounds that persisted, despite the application of three new coats of varnish.” The explanation of this phenomenon is simple: the B1- and B1+ mode frequencies exceeded the critical limits and the delta between the modes was altered.
A varnish that is too hard or too thick constitutes a serious defect, but can become an advantage when excessively low B1- and B1+ mode frequencies give the violin the timbre of a viola. Beware: implementing the following remedy requires much experience. Add a coat of varnish on one or on both plates, depending on the height of the B1- and B1+ mode frequencies. Wait for the varnish to dry, then take a reading of these modes. If the frequencies are not yet appropriate, add another coat of varnish.
When all the usual precautions are not taken, B1- and B1+ mode frequencies can rise abnormally. Therefore, the following parameters must be taken into consideration:
length of seasoning, dehydration of the wood, back plate deformation, hardness of the varnish.
A violin maker must create his/her own varnish and learn how it affects the frequencies. The violin must previously have been set up in the white and the frequencies noted for modes B1- and B1+, so that after varnishing, any modification of these modes, and hence of their delta, can be observed.
N.B. Many modern violin makers have observed that the sound of the violin has become hard, raspy, and aggressive after varnishing.
Varnish cannot add to the sonority of the violin, but it can subtract. A good varnish modifies the sound spectrum by filtering out undesirable harmonics or residuals, thus yielding a warmer, purer sound. The difference can be heard by comparing the sound of the violin in the white to its sound after varnishing. The violin’s quality has improved, yet it usually gives the impression of a loss of power: this is illusory, for the sound is purer and carries better.
In the summer, wood absorbs moisture, thus decreasing the top plate’s stiffness: the emission of low-frequency notes is difficult. The distance between the bridge foot and the sound post must be reduced, in order to increase the top plate’s stiffness in this region (2 mm).
In the winter, wood dehydrates, thus increasing top plate stiffness: emission of high notes is difficult.
It is possible to have a fine ear as the Italian violin makers did and try their practices. Nevertheless, tradition should not be an obstacle to the use of modern technological means to improve the sound of its violins.
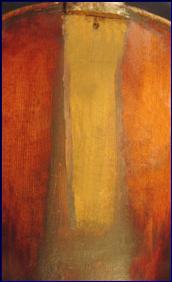
to the region of wear. Italian makers did not originally varnish the top plate of their violins beneath the fingerboard, which gave the plate greater freedom to vibrate in this region (less damping).
Copyright © 2010 - 2025 Patrick Kreit. Reproduction of any content of this site without my express written permission is prohibited.
|